While detailed plans for certain kinds of pole buildings appear later in Part IV, this may be a good time to run through the steps of pole construction in general. This will give an overview that will help explain what pole construction entails, and what to look for in plans.
This description assumes the building to be on fairly level ground, but with a slight slope for good drainage. It is wise in constructing any building (pole or conventional) to avoid low-lying ground with a high water table. Also avoid heavy, wet clay soil if you can. Sandy gravel is best, as is shown in the Tables on pages 38 and 40. Hillside pole construction requires different pole embedment techniques, which are pictured later and are noted by the Table on page 39.
Layout for the Poles
To begin with, of course, all of the tools that will be used, as well as all materials needed for the completed framing and roofing, should be assembled on the site. If you are going to bolt the plates to poles (see Page 44) or pre-bore nail holes (Page 44), a temporary electric power source will be helpful. This is to allow the use of an electric drill and later, in the sheathing work, an electric saw. If the building will not have
electric service, of course both functions can be accomplished with hand tools. Hand-boring at elevation for the ridge plates, is difficult, however, when working from a ladder rather than scaffolding. See suggested tool list on page 100.
You start to lay out the building by setting up batter boards at the far corners. Run strings between the batter boards to outline the building, as shown on page 35.
Square the corners with care by means of a builder’s triangle (see illustration) and, to use lumber efficiently, with sides of 6, 8 and 10 feet, or any multiples of 3, 4 and 5 feet. These string guidelines serve to locate the holes for the outer poles.
Each of the building plans which follows shows in the Floor Plans the distances between the poles. Often there are extra, close-set poles to frame doorways, but in general—if you are making your own plans—pole distances and plate sizes should be determined by applying the Maximum Span Chart on Page 56. Long spans may present problems of sidewall rigidity, but this can be compensated for by using extra girts (see page 51).
Long pole spans will impose added loads from the roof rafters to the eaves plates. Therefore, as pole distances are increased, it is advisable to increase the dimensions of the eaves plate stock (such as from 2 x 8s to 2 x 10s, or 2 x 10s to 2 X 12s) as shown in the Page 56 Chart. The same is true for sill plates if heavy floor loads are anticipated.
If the plans and dimensions given in this book are modified, or if you are developing your own new plans, try to keep distances to match standard lumber lengths in order to minimize waste. Board and timber ends are useful, however, for blocking, shims, etc.
It should be noted here that in working with any pole plans it is difficult to control the building’s precise dimen-
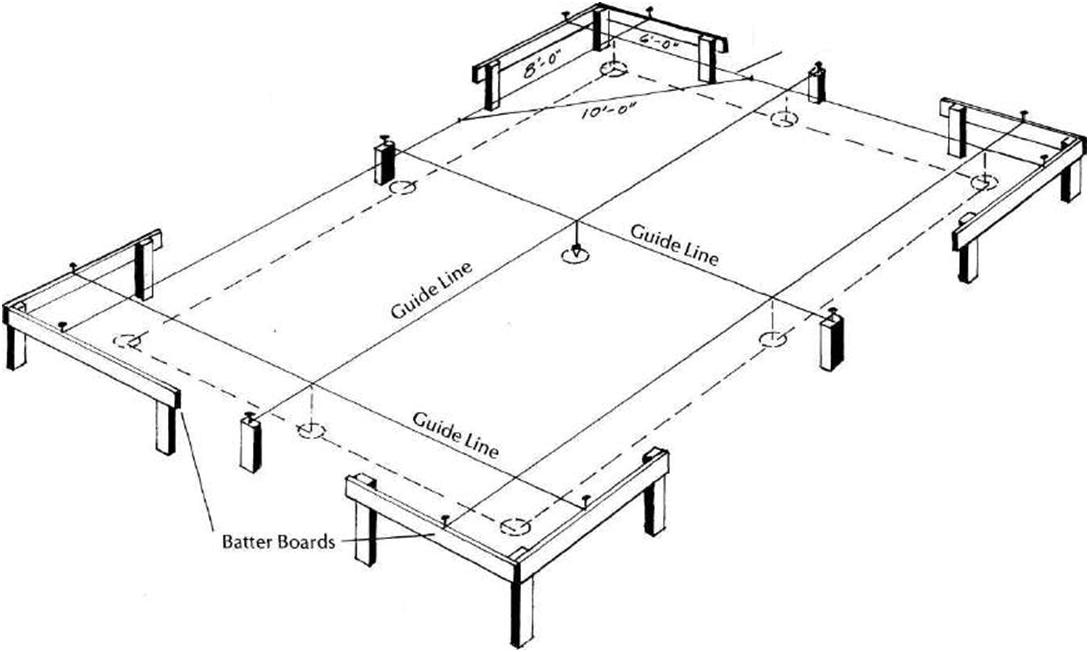 LAYOUT FOR THE POLESWITH BATTER BOARDS You start the layout of a pole building by the use of batter boards at the corners, just as in the construction of a conventional building. Squaring Corners |
||
| \ | |||||||
| ‘ ^ / \ / ‘v ^ f » | |||||||
 |
|||||||
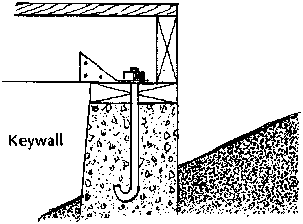
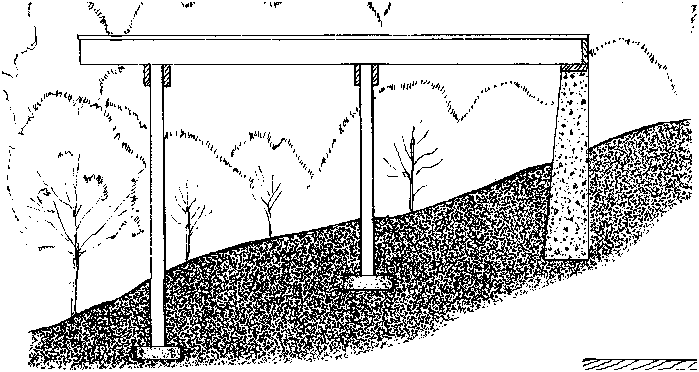
| POLE PLATFORM PLAN ON STEEP SLOPE Note in the Tables B and C that pole embedment of uphill poles must be deeper when the building Is on a slope. The same is true in a pole platform construction, as shown here. Note the uphill use of concrete keywall. |
|||||||
| sions on the basis of distances from center to center of the poles. This is because the poles may vary by an inch or two in diameter at a given height. Therefore, if it is important to hold a building to exact dimensions, measure distances from the outside to outside of the poles, and add side shims to bring widths up to the set dimensions. Determine the location of the poles from the plans, and measure the spacing of poles on the guidelines. Drop a plumb bob from the measured spacing and, for the outside poles, mark the center of the pole holes 5 or 6 inches in from these points by means of small stakes. When all the pole hole positions are marked by stakes, remove all the interior guidelines. Now you are ready to dig your holes and set the poles. The width of your building will determine whether or not the plans call for interior poles, as well as the type of rafters or trusses needed. |
|
||||||
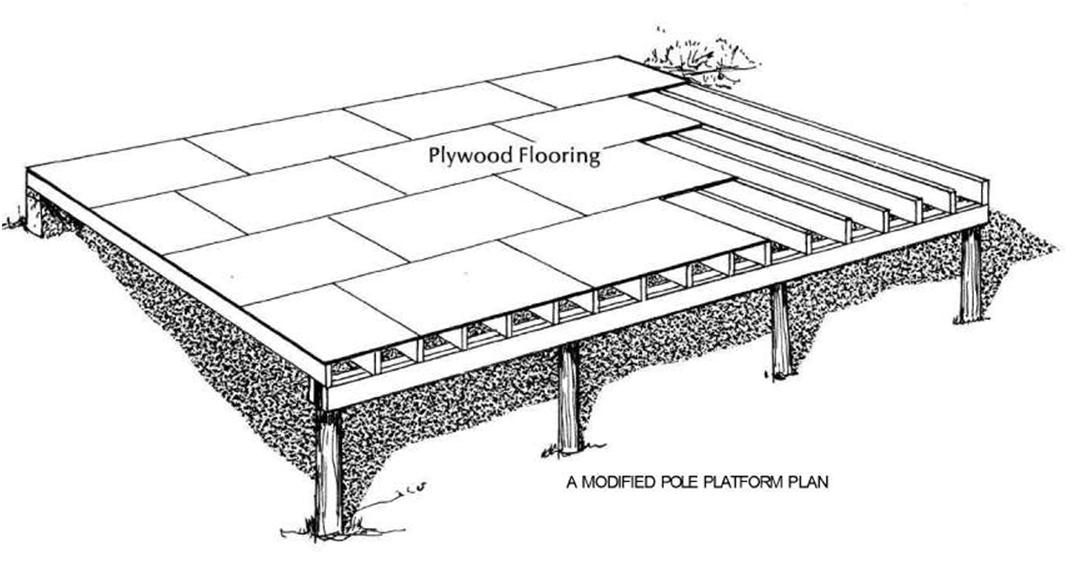
| The pole platform construction shown here is essentially the same structure shown In side elevation on the facing page. There, however, center poles are added and heavier floor joists are used to support an Increased load. In both Instances conventional frame construction Is used atop the pole platforms. |
|||||||