| Most Tekla Structures commands ask you to pick points to position objects in a model. Snap priority, snap switches, and snap settings all affect picking. Snap zone Each object has a snap zone. It defines how close you need to pick to hit a position. When you pick within the snap zone of an object, Tekla Structures automatically snaps to the closest pickable point on that object. |
||
| Icon | Positions to pick | Description | Symbol | |||||
 |
Reference points | You can pick the object reference points, i.e., the points that have handles. | Large | |||||
 |
||||||||
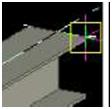
| Geometric points | You can pick any points on objects. | Small | ||||||
 |
||||||||
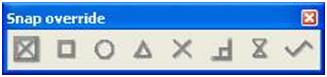
| Other snap switches | The following table lists the remaining snap switches. You can have Tekla Structures display the snap symbols in the model when you move the mouse pointer over objects.The snap symbol is green for objects inside components, and yellow for model objects. | |||||||
| Icon | Positions to pick | Description | Symbol | |||||
 |
Points | Snaps to points and grid line intersections. | 13 | |||||
 |
End points | Snaps to end points of lines, polyline segments, and arcs. | 13 | |||||
 |
Centers | Snaps to centers of circles and arcs. | B | |||||
| Midpoints | Snaps to midpoints of lines, polyline segments, and arcs. |  |
||||||
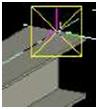
| Intersections | Snaps to intersections of lines, polyline segments, arcs, and circles. |  |
||||||
 |
Perpendicular | Snaps to points on objects that form a perpendicular alignment with another object. |  |
|||||
 |
Nearest point |
Snaps to the nearest points on objects, e.g. any point on part edges or lines. |
 |
|||||
 |
Free | Snaps to any position. |  |
|||||