
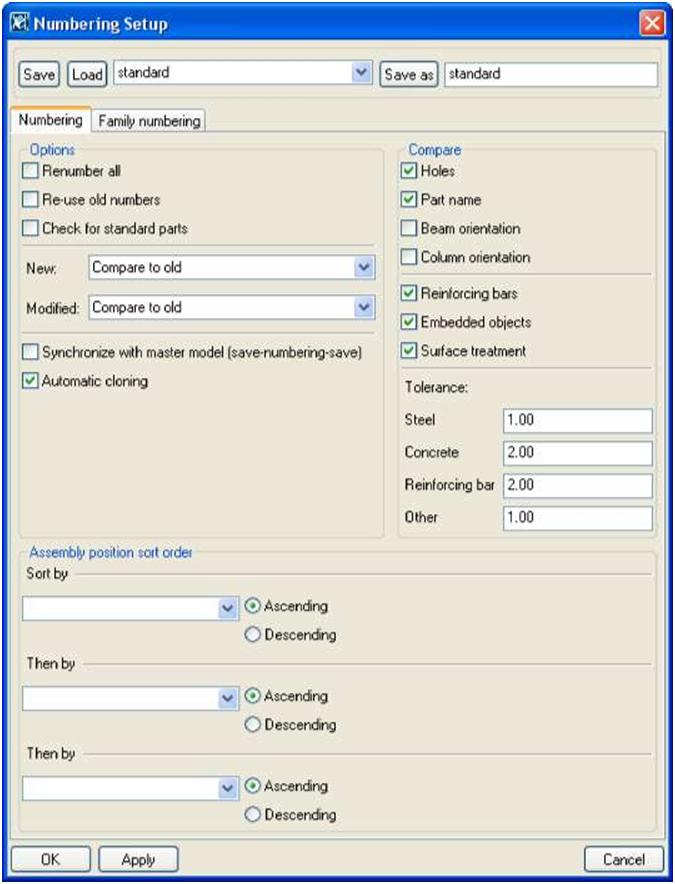
| Numbering settings To open the Numbering Setup dialog box, click Drawings & Reports > Numbering > Numbering Settings…: |
|||
 |
|||
| You can use various numbering options: | |||

 |
|||
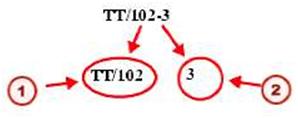
| MJ Family number (2JQualifier | |||
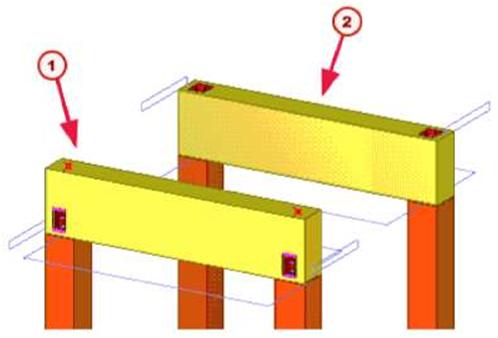
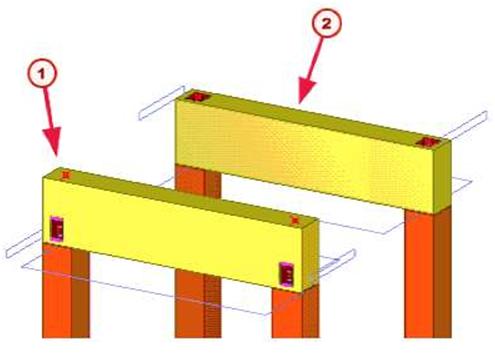
| See also | • The family number is the same for assemblies and cast units which match the criteria you define in the Numbering setup dialog box. • Assemblies or cast units which have the same family number but different exact geometry or materials get unique qualifier numbers. Assigning family numbers for series On the Family numbering tab, you can assign family numbers for series. For example, the following two beams both have the numbering series prefix B: |
||
 |
|||
| fl) Assembly position: B/1 \2JAssembly position: B/2 | |||
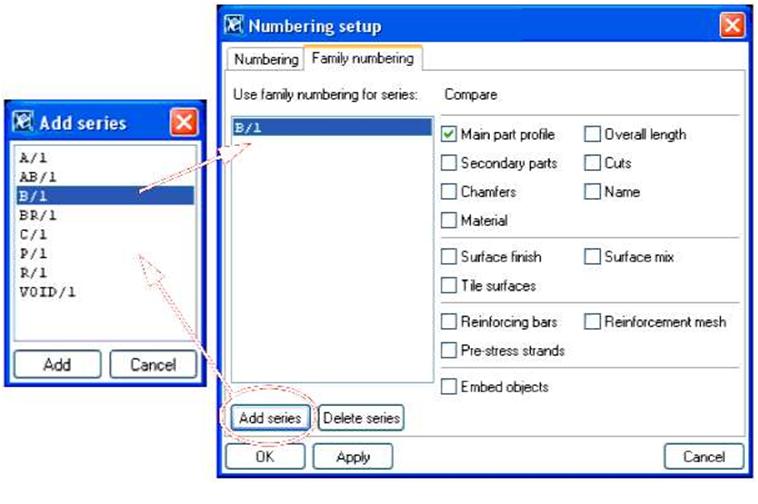
| Usage | The beams are otherwise similar, but the connections used are different. To assign family numbering for the series: 1. Click Drawings & Reports > Numbering > Numbering Settings… to open theNumbering Setup dialog box. 2. On the Family numbering tab, click Add series to open the Add series dialog box, which lists all the assembly and cast unit numbering series in the model. |
||
| TEKLA STRUCTURES 14.0 171Settings and Tools | |||
| 3. Select the numbering series B/1 and click Add. The numbering series appears in the family numbering list. | ||||
 |
||||
| 4. Use the Compare section of the dialog box to define what to compare for thenumbering series. Define the compare criteria for each numbering series separately. a Select at least one checkbox, but not all of them. b If you select all checkboxes, the family number will be the same as the normal assembly position, and the qualifier number will be 1 for all. If you do not select any checkboxes, only one family number per series is assigned. 5. Click Apply or OK. 6. Update the numbering in the model. 7. Tekla Structures assigns the beams family numbering. |
||||
| Result | Tekla Structures considers beams different according to the compare criteria you defined, and they get different family numbers: | |||
 |
|||
| (T) Assembly position: B/1-1 f2JAssembly position: B/2-1 | |||
| Usage | Assigning family numbers for parts To assign a family number and/or family qualifier for parts: 1. Select the objects whose family numbers you want to change. 2. Click Drawings & Reports > Numbering > Change Number > Family Number…. 3. In the Assign Family Number dialog box, enter the desired values in the Family number and Family qualifier fields. |
||
| Assembly position numbers | |||
| You can sort the order in which assemblies are given their position numbers. To do this, use the options in the Numbering Setup dialog box: | |||
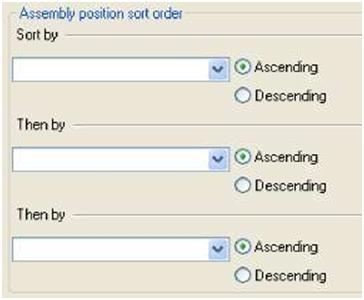 |
|||
| You can sort the position numbers in ascending or descending order. | |||
| TEKLA STRUCTURES 14.0 173Settings and Tools | |||
| The sort order can be based on the following criteria: • The x, y or z coordinates of the main part of the assembly. • The user-defined attribute of an assembly. • The user-defined attribute of the main part. If your sorting is based on user-defined attributes, Tekla Structures displays a list box that includes all the available user-defined attributes. When sorting by x, y or z coordinates, the sorting is based on the center of gravity of the reference axis.
|
|||
| ■s | Sorting by user-defined attributes or by location does not affect the part position. | ||
| J? |
If you add new parts, already numbered objects are not renumbered to suit the sorting order by, for example, the x coordinate. In this case you should renumber the parts. |
||
| See also Numbering Settings… Part numbers This example explains how different numbering settings result in different part numbers when you modify a part. 1. Create three identical beams with the numbering series prefix P and start number 1. 2. Number the model. All the beams have the part position number P1. 3. Modify one of the beams. 4. Number the model. You should now have two beams P1 and one P2. 5. Change beam P2 to be identical to the others. 6. Number the model. Tekla Structures assigns different part position numbers to this part, according to which numbering settings you used, as follows: • Compare to old: P1 • Keep number if possible: P2 • Take new number: P3 Project phases When you start modeling a project, the required numbering settings may be totally different from what they are after the project has been issued for the first time and you start revising the model. |
|||
| 174 TEKLA STRUCTURES 14.0 Settings and Tools | |||

| To control numbering settings on different phases of the project, create pre-defined numbering settings for the different phases of the project. Save the settings with the Save asbutton. For example: • Phase 1 – Stick modeling Doing only modeling before any drawings are released. At this stage you may even want to select Renumber all, or at least Re-use old numbers. • Phase 2 – Drawing issue When the first set of drawings is issued, but modeling continues, you may want to minimize the effects to already issued drawings. You can do this for example by selectingKeep number if possible in the Modified list box. • Phase 3 – Revisions At some point the project is more or less finalized, and any changes to the model should be handled in a different way than before. You may want to take a new number for all modified parts, not comparing them to any of the existing parts. To do this, select Take a new number in the Modified list box. |
||||
| . | When you reach the next step in a project, you can load pre-defined settings, and then save them as standard. This way the standardsettings are always automatically loaded from that point on when someone opens the model. | |||
| Applying numbering When you apply numbering, Tekla Structures assigns marks to parts and assemblies. Numbering is carried out according to the settings in the Numbering Setup dialog box. |
||||
| Pop-marking Example |
Pop-marking for NC files also affects numbering. When pop-marking is activepop-marks, Tekla Structures will assign different numbers to identical parts if they have different pop marks. Two main parts in different assemblies are identical, apart from a difference in the position of the plates welded to them. In this case, Tekla Structures assigns them different numbers. You can safely interrupt numbering before it is complete by clicking Cancel in the dialog box Tekla Structures displays while it is running. If you interrupt numbering, parts and assemblies retain their original numbers. Click Tools > Display Log File > Numbering History… for a report showing the numbering |
|||
| history. | ||||
| T | For information on how to interpret the log file, see Log files in the online help. | |||
| Applying num- To apply numbering, click Drawings & Reports > Numbering. You have the following options: bering |
||||
| TEKLA STRUCTURES 14.0 175Settings and Tools | ||||
|
||||||||||||||||||||||||||||||||||||||||||
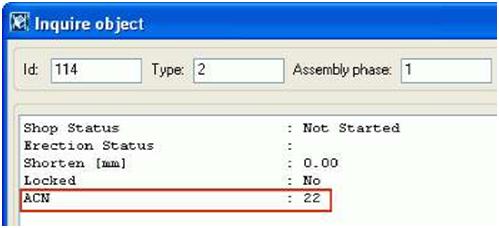
| Assigning control numbers to parts Control numbers are properties that identify the location of parts in a model. Use the Create control numbers (S9) macro to assign control numbers to parts. You can have TeklaStructures assign consecutive control numbers to all parts in the model, to selected parts, or only to parts in a specific numbering series. Each part gets a unique control number. To display control numbers in drawings, reports, or when you use the Tools > Inquire > Object command, select the property, ACN. |
||||||||||||||||||||||||||||||||||||||||||
 |
||||||||||||||||||||||||||||||||||||||||||
| For more information on how to use this tool, see the online help. | ||||||||||||||||||||||||||||||||||||||||||
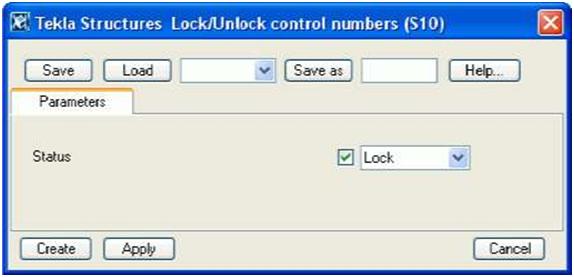
| See also To find out how to display control numbers in drawings, see User-defined attributes in marks in the Drawing Manual. Locking and unlocking control numbers To prevent Tekla Structures from renumbering the control numbers of all parts in the model, or of specific parts, use the Lock/Unlock control numbers tool. To lock or unlock control numbers: 1. Click Drawings & Reports > Numbering > Lock/Unlock control numbers: |
||||||||||||||||||||||||||||||||||||||||||
| 176 TEKLA STRUCTURES 14.0 Settings and Tools | ||||||||||||||||||||||||||||||||||||||||||
 |
||
| 2. To define which parts’ control numbers to lock or unlock: | ||
| • To lock or unlock the control numbers of all parts, do not select any parts in the model OR • To lock or unlock the control numbers of specific parts, select the parts in the model. 3. Select Lock or Unlock in the Status list box. 4. Click Apply, then Create. The user-defined attribute ACN_STATUS tells you if a part’s control number is locked or unlocked. |